
If you’re on the same LAN, just join via the GUI for a quick and easy setup. But my servers are in two different locations, so being on the same LAN is impossible. Still, I want to deploy a Cluster, and this post targets distributed nodes not on the same LAN
This is one of the hardest things I’ve done in my homelab journey. Mr. Thuan Bui also doesn’t have a post about this, so this one will be very detailed.
After removing the VGA, I installed Proxmox for Node PVE2 like in post 1, of course dealing with nomodeset
Then I pinned the PCIe port indexes using the command from post 24
Install Tailscale for Proxmox
Here I install directly on both PVE nodes that will join the Cluster
curl -fsSL https://tailscale.com/install.sh | sh
systemctl enable --now tailscaled
tailscale up --ssh
After running, you’ll get a link to log in to Tailscale
Configure Tailscale
I changed the IPs of the two PVE nodes to make them easier to remember
pve: 100.122.1.1
pve2: 100.122.2.2

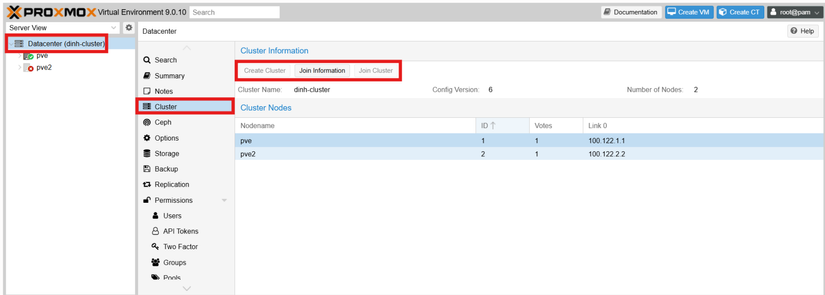
Create Cluster
Go here to see if there’s already a Cluster. If not, click Create Cluster and fill everything in. For LAN, just enter the only LAN you have.
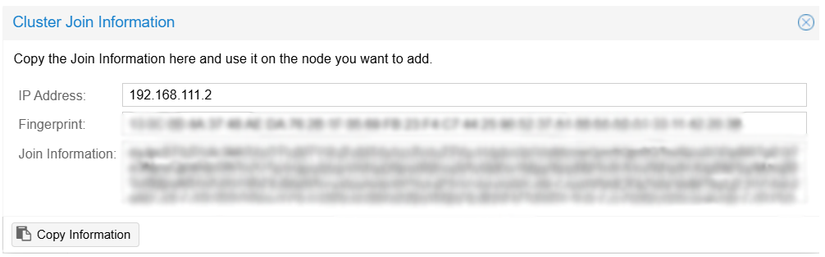
A legacy from post 1, this is the config from the very early days when I installed Proxmox.
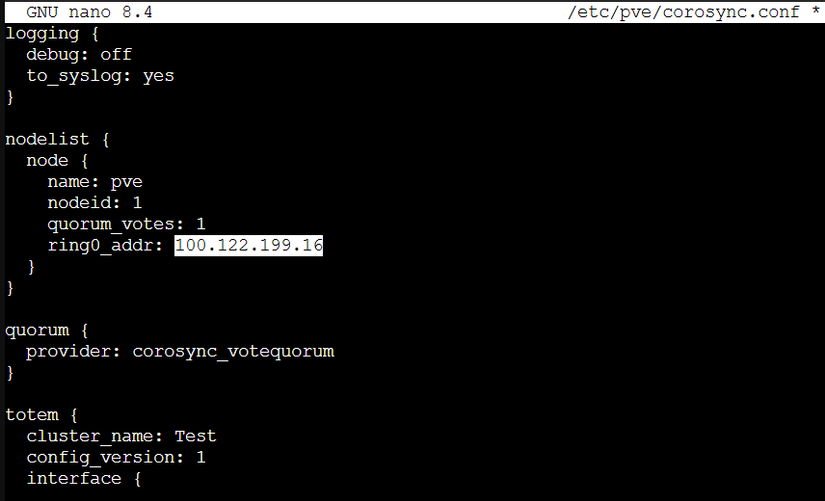
To fix the communication port config (192.168.111.2), edit corosync.conf using the command below
nano /etc/pve/corosync.conf
In the highlighted part, I entered the Tailscale IP of the PVE node.
After filling it in, restart the corosync service with
systemctl restart corosync
pvecm status
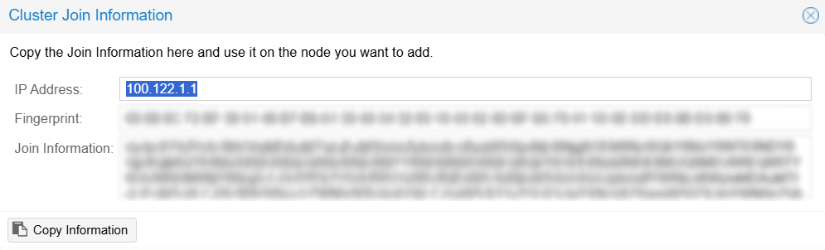
Then the Cluster IP Address will be changed as desired.
Join the Cluster
Before joining, ensure a few things
- Both PVE nodes can ping each other and vice versa
- Their SSL must be the one signed by PVE itself
In post 14 I used Cloudflare Origin SSL, so I had to change SSL back to the one signed by PVE.
Start in Shell of Node PVE2
pvecm add 100.122.1.1 --link0 100.122.2.2

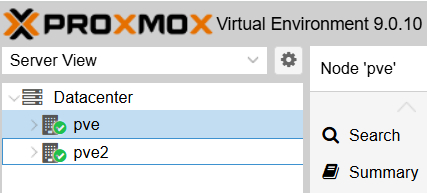
It shows like this. Check the Cluster and if the node is there, it’s a success.
Result
If you see this, it’s done!
Summary of some errors encountered
Delete Cluster on PVE
To delete a Cluster and redo from scratch, you can only do it via CLI; GUI has no delete button
systemctl stop pve-cluster corosync
pmxcfs -l
rm /etc/corosync/*
rm /etc/pve/corosync.conf
killall pmxcfs
systemctl start pve-cluster
Cannot connect to Proxmox WebUI
SSH into the Proxmox node fails, then use:
pvecm updatecerts --force
systemctl restart pveproxy
PVE2 joined the Cluster but is down
When PVE2 has joined but errors related to SSL cert or cannot connect to PVE2 while accessing the GUI, or PVE2 crashed/shutdown
pvecm expected 1
pvecm delnode pve2
Explanation: Proxmox nodes are equal, no master/slave. It’s democratic so you must force quorum to 1. To let PVE (node 1) have full control, post 26 will talk more about this.


Comments
Join the conversation
Leave a comment
No comments yet
Be the first to share your thoughts!